iTRAQ Quantitative Proteomics
A guide to sample preparation
Written by Qifeng Lin, Teck Kwang Lim, Qingsong Lin of the Protein and Proteomics Centre, Department of Biological Sciences, National University of Singapore
iTRAQ® is a powerful quantitative proteomics technique for broad and unbiased quantification of proteins expressed across multiple biological samples. iTRAQ generates relative quantitative proteome profiles and enables you to perform comparisons across multiple samples in a single experiment. Examples include comparisons between healthy and disease/s, drug treatments or time-course studies.
Our typical iTRAQ 8-plex workflow processes up to eight different samples (e.g. 4 conditions, 2 replicates each). Two LCMS analysis options are available. The combined iTRAQ mixture can be directly analysed (single injection) to provide a quick and cheap overview of the dataset. Alternatively, for a deeper proteome coverage, offline fractionation (usually basic reversed phase LC) can be performed prior to the online LCMS analysis.
This guide is a primer to our standard iTRAQ labelling workflow, which broadly follows the SCIEX iTRAQ Reagents – 8plex Protocol booklet. We introduced several strategic modifications based on our extensive experience with the technology, including useful tips and quality control (QC) checkpoints at critical stages of the procedure. We have found these QC checkpoints to be highly useful in either verifying successful completion of each key step or identifying problems for troubleshooting.
Ensure samples are in appropriate buffers without any potential interfering substances, especially thiols and primary amines (see Table 2-1 in iTRAQ 8-plex labelling protocol).
STEP 1: Reduction, Alkylation and Trypsin Digestion
REAGENTS REQUIRED
This protocol assumes that the samples are in an appropriate buffer and total protein quantification performed to ensure that the starting material for each sample is equal.
- Dissolution buffer: 0.5 M triethylammonium bicarbonate (TEAB)
- Reducing Reagent: 50 mM tris-(2-carboxyethyl) phosphine
- Cysteine Blocking Reagent: 200 mM methyl methanethiosulfonate in isopronanol
PROCEEDURE
1. To each of up to eight samples tubes (each containing 20 to 100 µg protein), top up each sample to 20 µl using the appropriate sample buffer.
2. To each sample tube, add 2 µl of Reducing Reagent.
3. Vortex to mix, then briefly centrifuge.
4. Incubate the tubes at 60oC for 1 hour.
Important tip: If your sample buffer contains urea, incubate the tubes at 37oC for 1 hour instead.
5. Briefly centrifuge to bring the sample to the bottom of the tube
6. To each tube, add 1 µl of Cysteine Blocking Reagent. This step can be performed in the fume hood as the odour of the reagent might be unpleasant.
7. Vortex to mix, then briefly centrifuge.
8. Incubate the tubes at room temperature for 10 minutes.
Important: If sample buffer contains chemicals which may interfere with trypsin activity (e.g. chaotropic agents, detergents or surfactants), dilute using 50 mM TEAB to reduce the chemicals to trypsin compatible levels. For instance, trypsin is compatible with 1 M urea and 0.05% SDS.
9. Reconstitute sufficient vials of trypsin with 25 µl of ultrapure water each.
Recommendation: 1 vial of trypsin for two samples (of 100 µg each)
10. Vortex to mix, then briefly centrifuge.
11. To each sample, add 10 µl of the trypsin solution.
12. Vortex to mix, then briefly centrifuge.
13. Incubate the tubes at 37oC overnight (12 to 16 hours).
14. Briefly centrifuge to bring the protein digest to the bottom of the tube.
15. Evaporate the rest of trypsin-digested samples to dryness.
QC Checkpoint: Aliquots from before and after digestion can be analysed using SDS-PAGE to verify complete digestion. If any sample shows incomplete digestion, trypsin digestion should be repeated.
STEP 2: Labelling peptides with iTRAQ reagents
1. Reconstitute each sample in 30 µl of Dissolution Buffer (0.5 M TEAB).
2. Freshly prepare the 8-plex iTRAQ reagents.
3. Allow each vial of iTRAQ reagent to reach room temperature.
4. Briefly centrifuge to bring the solution to the bottom of the vial.
QC Checkpoint: Visually inspect the iTRAQ reagent levels in the vials to ensure approximate equal solution volumes in each vial.
5. Add 50 µl of isopropanol to each vial of iTRAQ reagent.
6. Vortex each vial to mix, then briefly centrifuge.
7. Transfer all the contents of each iTRAQ reagent vial to its respective sample tube.
8. Vortex each tube to mix, then briefly centrifuge.
9. Test the pH of the contents in each tube by placing 0.25 to 0.5 µl of the solution on a pH paper with range 7.0 to 10.0. It is critical to ensure that the pH of the solution is greater than 7.5.
QC Checkpoint: The optimal pH range for the labelling reaction is between 7.5 to 8.5. If necessary, adjust the pH of the solution using the Dissolution Buffer (0.5 M TEAB). However, the amount of Dissolution Buffer added should be noted to maintain the total organic concentration of the solution at a minimum of 60%. If required, more isopropanol can be added.
10. Incubate the tubes at room temperature for 2 hours.
11. Combine the contents of each iTRAQ reagent-labelled sample tube into a single tube[1].
12. Determine the sample clean-up procedures depending on the initial sample buffer. If the sample buffer contains detergents (e.g. SDS, triton X-100), refer to the next step. If not, skip to step 32.
13. Most detergents can be removed by strong cation exchange (SCX) chromatography (a cartridge-based method is suggested in section 3.1). For commercial surfactants, follow the manufacturer recommended procedures for removal.
14. C18 reversed phase (RP) desalting should be performed to ensure that the peptides are in MS-compatible buffers. For a suggested C18 desalting method, see section 3.2.
STEP 3: Sample clean-up
3.1 Strong cation exchange cartridge chromatography
- ICAT® Cation Exchange Buffer Pack (SCIEX, part number 4326740)
- Cartridge Holder (SCIEX, part number 4326687)
Refer to the iTRAQ reagents 8-plex protocol for more details on the reagents (Page 3-3).
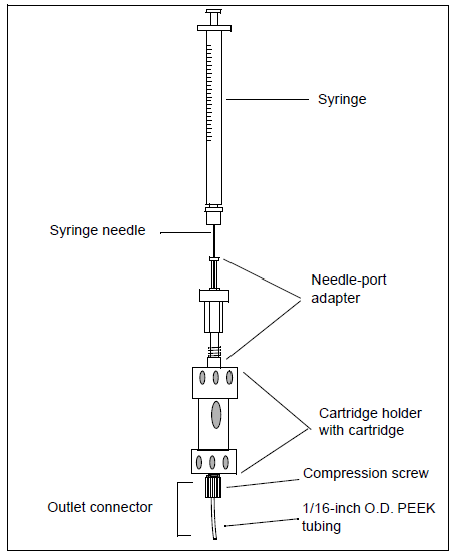
When instructed to inject a solution in the procedures:
- Fill a clean syringe (5 ml) with the indicated solution.
- Remove air bubbles.
- Insert the syringe needle (blunt tip) into the needle-port adapter.
- Press the syringe plunger to inject.
After each injection, wash the needle and syringe several times using ultrapure water, and once with the next solution before refilling the syringe for the next injection.
1. Dilute the sample mixture at least 10-fold using the Cation-Exchange Buffer-Load.
2. Vortex to mix.
3. Remove an aliquot of 0.25 to 0.5 µl and check that the pH is between 2.5 and 3.3.
QC Checkpoint: If the pH is not between 2.5 and 3.3, adjust using 1N phosphoric acid.
4. Setup the cation exchange cartridge system as shown below:
5. To condition the cartridge, inject 1 ml of the Cation Exchange Buffer-Clean. Divert to waste.
6. Inject 2 ml of the Cation Exchange Buffer-Load. Divert to waste.
7. Before injection, centrifuge the sample mixture and avoid aspirating any precipitate that might be pelleted at the bottom of the sample tube.
8.Slowly inject (1 drop/second) the diluted sample mixture onto the cation exchange cartridge and collect the flow-through in a sample tube.
9. Inject 1 ml of the Cation Exchange Buffer-Load for washing. Collect the flow-through in a sample tube.
Important tip: Retain the flow-through(s) until MS/MS analysis is completed. In the event that the loading on the cation-exchange cartridge failed, the flow-through can be re-loaded onto the cartridge after troubleshooting the reason for loading failure.
10. To elute the peptides, slowly inject (1 drop/second) 500 µl to 1 ml of Cation Exchange Buffer-Elute. Capture the eluate in a clean sample tube.
11. Wash the undigested proteins such as trypsin from the cation exchange cartridge by injecting 1 ml of the Cation Exchange Buffer-Clean. Divert to waste.
12. Inject 2 ml of Cation Exchange Buffer-Storage and store the cartridge as recommended.
3.2 C18 reversed phase desalting
All solvents used to prepare the Sep-Pak reagents should be HPLC or MS grade.
- SP Activate: 100% ACN (0.05% TFA / 0.1% FA)
- SP Load: 2% ACN (0.05% TFA / 0.1% FA)
- SP Elute: 80% ACN (0.05% TFA / 0.1% FA)
Sep-Pak® C18 Classic Cartridge, 50/pack (Waters, WAT051910)
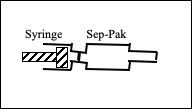
General principles of using the syringe covered in the previous section still applies, except that the syringe needle is not required here. Care must be taken to avoid introducing any air bubbles into the cartridge.
1. Dilute the sample by topping up to 5 ml using SP Load.
2. Setup the Sep-Pak C18 cartridge as shown:
3. Activate the Sep-Pak C18 cartridge by injecting 10 ml of SP Activate. Divert to waste.
4. Condition the cartridge by injecting 10 ml of SP Load. Divert to waste.
Checkpoint: The resin of the Sep-Pak C18 cartridge should appear uniformly translucent at this stage. If there are any patches on the resin appear opaque, a new cartridge should be used.
5. Slowly inject the sample into the cartridge. Collect and retain the flow-through in a sample tube.
6. Wash the cartridge using 5 ml of SP Load. Collect and retain the flow-through.
7. Elute the peptides using 10 ml of SP Elute. Collect the eluate in a clean sample tube.
8. Evaporate the eluate to dryness. If using a lyophilizer, dilute the eluate with an equal amount of ultrapure water and mix well before freezing.
9. The sample can now be reconstituted in any appropriate buffer for downstream LC-MS/MS analysis.